Wednesday 6 November 2013

last lesson tegan and i got very excited and started celebrating the finish of our trebuchet too soon find out we forgot to make something for the golf ball to sit in. so we will definitely be finished next lesson and will begin testing. here is some pictures of the very final stage of construction.


Saturday 2 November 2013

nearly finished

we have now nearly completed our trebuchet. last lesson we finished making the arm for the trebuchet and had to make a few adjustments to counter for the 4kg weight that must be used.

we then attached the arm to our trebuchet and did a few test runs with a light 1kg weight to make sure it works and it did! 


we should be finished our trebuchet next lesson. all we have to do now is make the wheels for the base to make it fly further and create a trigger mechanism to hold the arm in place when you go to release it. 

Monday 28 October 2013

pictures from last lesson

last lesson tegan and I screwed our 2 triangular support arches to our base using a power drill. tegan and I did a great job and all the screws went in perfectly without any screw ups resulting in our trebuchet being perfectly lined up. this was because we used this 9mm wooden stick that we placed through the top of the arches which allow us to screw down each side to line up with the holes at the top.

Here is a picture

after this we had to cut the 9mm metal rod that will be holding up our arm of our trebuchet. we then added a series of washers and bolts to secure the metal pipe in place.


Thursday 24 October 2013

pictures

as promised here is a picture of tegan and i progress.

this is a top view and bottom view of the base in which is that main part of our trebuchet.


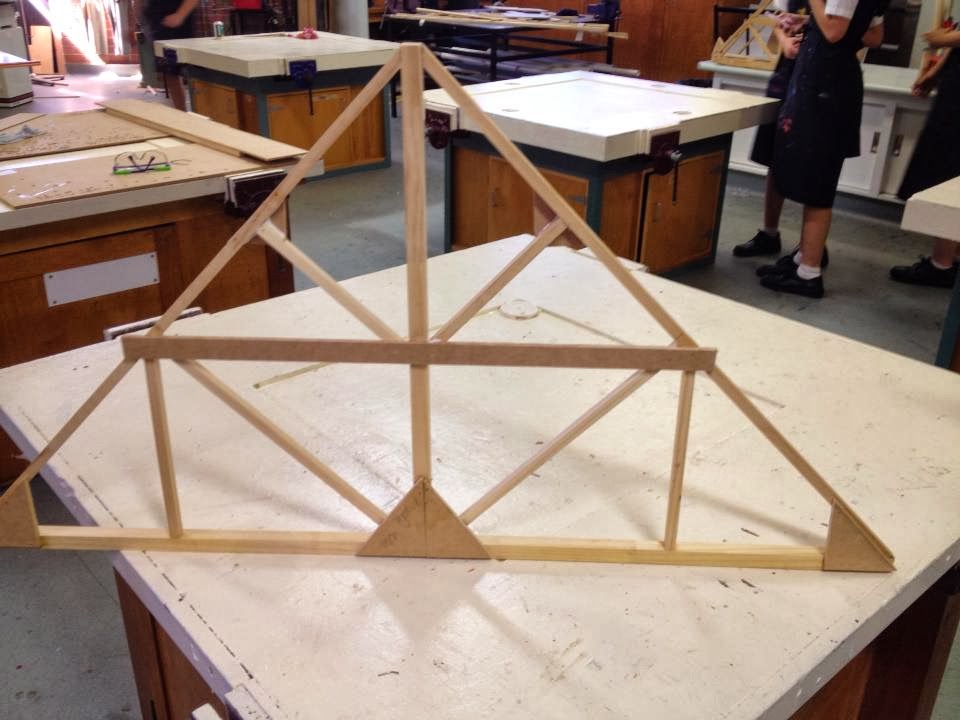
the next step was to make the support arches by first making the middle beam and then filling in the gaps between with support triangles and right angles to ensure maximum strength 
here is a picture of one of the complete support arches for our trebuchet

Monday 14 October 2013

the first week of construction is now over and tegan and i have made great progress. we have completed our base and 1 side of the support for the trebuchet. on each side of the trebuchet we have now decided to use a strip of MVF board to add extra support. this week we will continue building our trebuchet starting oof by making the other support. on my next post i will show you some photos of our progress.

Tuesday 17 September 2013

trebuchet

tegan and I have just finished our ideation for our trebuchet and here are our ideas. we have decided to go with the design with the dimensions on it. We think that this will be the strongest design as it has alot of triangular support beams.

Tuesday 3 September 2013

we have now received our new design brief and its to make a trebuchet. we are working in pairs and i am working with tegan. this unit looks quite interesting and i am excited to start making my trebuchet. :)

Wednesday 21 August 2013

finsished car

my idea of making a brand new car got scrapped in the last lesson due to lack of time. So i worked to develop my car the best i could to produce the fastest possible time. Here is some images of my finished car and the time which my car produced on the race track. The time was 3.301secs.

Wednesday 14 August 2013

wednesday

on wednesday i completed my car. i cut and soldered the wires, glued down my battery and motor and took it for a test run. however when i test ran it, it was very slow coming in at about 4seconds. i evaluated my car and i came to the conclusion that my car was just too big and heavy and im going to start from scratch and make a new one.

Friday 9 August 2013

yesterdays lesson

in yesterdays lesson mr ward showed us how to use bob cutters to cut the wire for our race car. this was called mechanical advantage as it was a very easy machine to use. here is some photos

of my progress so far

Tuesday 30 July 2013

ideation phase

this week in Design Futures we have begun ideating for our race car. i did some research for aero dynamic designs and found these and have based the shape of my car from these ideas. in my next post i will show you my planning drawing for my car and the design I believe will be the fastest

Thursday 25 July 2013

todays lesson

today in DT we learned about wiring our race car. Mr Ward showed us which wires connect to each other to get the engine to start. he also showed us the examples of previous cars and there different aspects. we also found out a few different ways to reduce friction and how to take the hub and tyre. over the weekend i will begin researching different ways to reduce friction and good designs so when we get back on monday i can begin planning my race car

Wednesday 24 July 2013

race car brief

Today we were given the design brief and a quick outline of this terms work which is to make a race car. we were given our packs including wheels, batterys, motor and all the essential things needed to construct our race car. we also went into the workshop and was shown the race track and an few examples of previous cars racing down the track. next lesson i will begin researching the different aspects of the car and look for ways to reduce friction trying to make my car as fast as possible.

Monday 17 June 2013

ideation

here is one of my ideation drawings that i have completed as preparation into designing my final torch.

EVALUATION: 

this torch is effective in its purpose which was to be used as a safety device which is the radio. the torch has a slim design for easy hold and also has a indented hand grip for a stronger hold. Although it fits the design brief and does its job, it is not very appealing to the eye and is pretty plain and ugly. A more complex/interesting design may be an improvement that i can make to further improve this torch in my next ideation drawing.

Monday 3 June 2013

Last friday we handed in our completed pro desktop exercises and i then began working on my torch. i have started looking for ideas on the internet of torches and safety devices and i have a few ideas in mind. i drew some designs last lesson but there are faults that i can see that i will eliminate when i design some more next week after test block is finished

Sunday 26 May 2013

last week

last week in Design and technology I continued working on the exercises on pro desktop. at that stage i had finished the toy block, the toy block extension, the simple calculator, the clock face, cart wheel and the iphone, and had begun making part 1 of the ballpoint pen. Today was a very productive lessons having finished part 2 and part 3 and then assembled my whole pen. I also printed off all my exercises ready for submission so now i am beginning the ideation phase for my torch.

Thursday 9 May 2013

CAD introduction in more detail

CAD stands for 'Computer Aided Design'. It is the use of computer systems to assist in the creation, modification, analysis, or optimization of a design. CAD software is used to increase the productivity of the designer, improve the quality of design, improve communications through documentation, and to create a database for manufacturing.


http://en.wikipedia.org/wiki/Computer-aided_design


In our class lessons this week we have been practicing creating objects on PTC ProDesktop by following the instructions inv the 'Designing with Pro/DESKTOP textbook. I have completed exercises 2.2 and 2.3 (Toy blocks), and i am not currently starting exercise 5.1 (simple calculator design).

Tuesday 30 April 2013

todays lesson- introduction to pro desktop

Today Mr ward gave us a brief introduction to pro desktop which is our next unit for assessment. We are to design a torch of some description with a safety device for woman attached, using the CAD program. Using my knowledge from year 9 pro desktop unit, i am hoping to design something pretty cool and unusual.

Sunday 28 April 2013

oral presentation

Today I did my oral presentation on my resort. I'm not quite sure what my overall time ended up being but i found my oral went pretty smoothly although I was a bit nervous to begin with. everyone in the class did a very good job on their orals and all had some  very interesting environmental points that they raised which were very interesting. Next week we  will be starting on our robotics unit using pro desktop which will be a very interesting unit.

Monday 22 April 2013

speech

Because brogan is currently on exchange for the term i have been working on our  5minute speech and powerpoint presentation which i have to present by myself on friday. i finished the speech and sent it to brogan to edit and make any changes she thinks and write a conclusion. I have just timed it and it is 6minutes long so this lesson I have to cut it down to fit the 5minute time slot.

Tuesday 12 March 2013

while working in the workshop today and looking around the room, Brogan and I were a bit dissapointed to see alot of other groups doing a similar resort to us, and in particular one group who is pretty much copying us and keep coming over to our bench looking at what we are doing and keep asking where our materials are from. they have ended up using the exact same ideas that Brogan and I came up with at the very beginning of term such as the ring in the middle of the water as the broadwalk and water turbines under the resort as a way to create energy. we are a bit upset and dissapointed that they cant come up with their own original ideas. :(

progress

Brogan and I are making very good progress with our resort, and we have stepped it up another step to worker harder and faster during class since time is running out. Here is a picture of the roofs for the bungalows that i had to make at home due to lack of time.

Wednesday 6 March 2013

today's lesson

in todays lesson there were a number of students away because of QG but luckily my partner and I were both there for the class so we could continue with the making of our resort. Today we finished glueing the bungalows together using the hot glue gun and finished decking the bases for the bungalows using paddlepop sticks. we have now begun glueing match sticks together on each wall of the bungalows to create a bamboo looking affect. i will post a photo on friday of our progress.

Friday 1 March 2013

our resort

this week we have begun our project in the workshop and it is coming along well. we have cut and glue down a piece of wood which was stuck on top of the base indicating the land/shore. we are currently in the process of creating the boadwalk for our bungalows. today i started glueing on paddlepop sticks to create a timber effect like Bora Bora. this weeked im going to go to the shops and start looking for our materials for our project such as fake grass and trees, hay for bungalow roofs and timber decking paint.

Wednesday 20 February 2013

ideation pictures


sorry that you cant see some of them very well but here are our ideation drawings.

Tuesday 19 February 2013

ideation phase

Brogan and I ideation phase is going well and we have a large understanding of what we are going to create and we are thinking of a sustainable resort in Bora Bora which includes over water bungalows. To make our resort sustainable, we are going to include a skylight to allow for natural light, cross ventilation for airflow, bifold doors to allow natural light and cross ventilation, and water turbine to create energy. on my next post i will show you pictures and plans of our resort and hopefully by next lesson we will be in the workshop.

Wednesday 6 February 2013

Wardy's Workshop

Today we went into the workshop where Mr Ward showed us a demonstration of how to make the base for our sustainable resort. When making our base we will need a piece of DMF wood cut to 400mm x 400mm, Long blocks of wood to glue under the base to add extra height, nails, hammer etc. the machines that will be used are the band saw and belt sander. hopefully next lesson we can make a start, maybe even finish our base for our sustainable resort.

New Year, new unit

This year in our unit we are focusing on architecture and sustainable design. For this assessment we are to do it in pairs and I am going with Brogan. My partner and I are to are to design and fabricate a scaled model of our chosen theme-specific resort to be made on a base area of 400mm x 400mm. we have already begun the ideation phase and have a few very good ideas that we might consider including in our final product.