
Wednesday, 7 November 2012
Mechanism process
I have just completed my assignment questions as shown in my previous post. Now I am back in the workshop working on my 'Ocean motion' mechanism. It is finally starting to come together now as I have completed the box and some parts that go into it. Here is a picture of my mechanism so far
Monday, 5 November 2012
Questions for assessment 'Ocean Motion'
List the materials that were used in the construction of your mechanized
toy.
·
Plywood
·
Hot
glue gun
·
PVA
glue
·
Circular
Cams
·
Shaft
·
Crank
·
Dowel
·
Sand
paper
Describe some environmental problems, which are caused by the overuse of
wood products (i.e. deforestation).
The main environmental problem caused by the overuse
of wood products is deforestation. Deforestation
is the permanent destruction of indigenous forests and woodlands. The term does
not include the removal of industrial forests such as plantations of gums or
pines. Deforestation has resulted in the reduction of indigenous forests to
four-fifths of their pre-agricultural area. Indigenous forests now cover 21% of
the earth's land surface. Deforestation is brought about by, the conversion of
forests and woodlands to agricultural land to feed growing numbers of people,
the development of cash crops and cattle ranching, both of which earn money for
tropical countries, commercial logging (which supplies the world market with
woods such as meranti, teak, mahogany and ebony) destroys trees as well as
opening up forests for agriculture, and falling of trees for firewood and
building material; the heavy lopping of foliage for fodder; and heavy browsing
of saplings by domestic animals like goats.
To compound the problem, the poor soils of the humid tropics do not
support agriculture for long. Thus people are often forced to move on and clear
more forests in order to maintain production.
Another environmental problem that is caused by the overuse of wood
products is pollution. Pollution
is the introduction of contaminants into the natural environment that causes
adverse change. When a tree is chopped down to make paper, it goes through
factories, which use up energy creating greenhouse gases, such as carbon
dioxide. The waste from the factories then gets dumped into places such as the
river creating pollution, which is very bad for the environment.
Explain the difference between ‘open-loop and closed-loop’ control
systems. Give an example of each.
A closed-loop control system is a
system in which the output has an effect on the input in such a way as to
maintain the desired output value. An open-loop control system is a control system
that does not have a feedback loop and is not self-correcting. An example of an
open-looped control system would be a light switch. An example of a closed
switch control system would be refrigerator temperature
regulating system
Provide a brief description of 3 different types of mechanisms i.e.
linkage, cams
Cam- A cam is a
rotating or sliding piece in a mechanical usage used especially in transforming
rotary motion into linear motion or vice-versa. It is often a part of a
rotating wheel
(e.g. an eccentric wheel) or shaft (e.g. a cylinder with an irregular shape)
that strikes a lever
at one or more points on its circular path.
Linkage-A mechanical linkage is an assembly of bodies
connected to manage forces and movement. The movement of a body, or link, is
studied using geometry so the link is considered to be rigid. The connections
between links are modeled as providing ideal movement, pure rotation or sliding
for example, and are called joints. A linkage modeled as a network of rigid
links and ideal joints are called a kinematic chain.
Gear-A gear is a rotating
machine
part having cut teeth, or cogs, which mesh with another, toothed part in order
to transmit torque.
Two or more gears working in tandem are called a transmission
and can produce a mechanical
advantage through a gear ratio
and thus may be considered a simple machine.
Geared devices can change the speed, torque, and direction of a power
source. The most common situation is for a gear to mesh
with another gear, however a gear can also mesh a non-rotating toothed part,
called a rack, thereby producing translation
instead of rotation.
Provide an in depth description of the primary mechanism used in your
toy
The primary mechanism used
in my mechanical toy is the circular cams. In ‘ocean motion’ there are no cam
followers but each individual wave piece acts as its own cam follower and is
moving up and down in contact with the cam. ‘Ocean Motion’ works because when
the crank is turned, it turns the shaft where the circular cams are attached.
The circular cams rise at different times and heights creating the wave motion
because the cams are slightly offset from the cam before it. This makes each
wave piece lift up at different times.
Evaluate your finished product in terms of ergonomics, aesthetics and
function.
Although my mechanism ‘ocean motion’
is not fully completed, I have a fair idea of how my finish mechanical toy will
turn out. Ergonomics relates to the artefacts interaction with the human body
such as things like comfort, safety, and convenience, ease-of-use and
ease-of-sight. My quite proud of the mechanism that I have produced as it is
very safe made with strong glue and extra plywood to make sure it doesn’t brake
and injure someone who might be playing with it. The edges of ‘Ocean motion’
were also sanded down with sand paper to leave no sharp edges where a little child
could potentially cut itself on it. ‘Ocean motion’ is very convenient not only
for entertainment purposes but also for decoration purposes because its
ease-of-sight is very good and it is a very interesting piece of work and looks
attractive to the human eye. In terms of its ease-of-use, my mechanism is were
fluent and is very easy to use although there are a few minor areas that need
fixing.
Aesthetics relates to the mechanisms
colour, shape, proportion, texture and any other visual aspect of the artefact.
‘Ocean Motion’ is very appealing to the human eye due its unusual shape and way
of movement with the individual wave pieces moving up and down at different
times which people would fine fascinating, and without building experience, one
would be confused to how this motion is actually occurring. I find the
proportion of my mechanism the perfect size for any space whether you’re using
it as a decoration on a table or desk or whether it is just for entertaining
purposes. It is a handy size that it is not too big and not too small. I don’t
think I will have time to paint my mechanism due the shortage of lessons we had
this term, but hopefully I can paint it when I take it home.
The function is the most important
part to evaluating your product, because even though your product might look
the part, it might not do its part. My mechanism ‘Ocean motion’ was designed to
be able to turn a crank in a clockwise direction which will also rotate cams
attached to a shaft that lift the individual wave pieces up and down at
different times. My mechanism successfully does this although it is not perfect
and is still a few areas that need improvement. However, ‘Ocean motion’ still
performs very effectively creating a wave motion efficiently and fluently. If I
were to do this assessment again I would have fewer boats on the waves and
would turn the boat sideways so it looks like the boat is actually going up and
down the wave. Ideally though, if we did get the option to do this again, I would
probably choose a different me mechanism to make like the ‘Caterpillar’ and ‘Ocean
motion’ is very time consuming and at times can be very difficult to make.
Wednesday, 31 October 2012

Saturday, 13 October 2012
this week in design futures we have begun working in the workshop to create our chosen mechanism. i am working together with Tegan to make my mechanism as we are doing the same one and by working together, it will speed up the progress. So far Tegan and I have measured and cut all of the pieces involving the wave using the bandsaw which was very time consuming, but we are now up to sanding the edges of the wood so that they are a perfect length.
Tuesday, 18 September 2012
Mechanical toys
I have decided to create the 'ocean motion' mechanism. it involves a crank and cams. it also involves rotary motion on a horizontal axis and reciprocating motion. i am doing the same desgin as what is on mechanical toys and it suits the mechanism and looks cool when the crank is rotated.
Wednesday, 22 August 2012
today i went through the ideation phase. I practices making a few different designs on pro desktop by revolving them but some just didnt look that appealing. i kept trying and eventually i found a design that i really liked. and turns out Mr ward also really liked it as he gave me a chocolate for my design.
:)
:)
this week using the CAD textbook we created 2 cart wheels using the program por desktop. these took quite awhile to make but the finished product looked GREAT! we also started lookin up pictures on the internet of different types of vases to start thinking about our assessment for the ideation phase.
:)
:)
New unit!!!!!!
This term we are using the program on the school laptops called pro desktop. this is a very fun program because yo can create a lot of different things but sometimes can get a bit frustrating. in the past lessons we have been playing around and designing our own shapes and exploring the program, and we have learnt many new things such as Drawing shapes, selecting edges, selecting faces, selecting parts, extrude profile, revolve, project profile, duplicate, dimensions, toggle construction and many other cool features. But our assessment this term which is now underway is to create a vase and a stand. this is to be done by using our knowledge and design skills to create something extraordinary and something that will stand out.
Tuesday, 5 June 2012
Evaluation
FUNCTION:
Does the artefact do what it was designed to do?
Yes the desk tidy was meant to hold a variety of items to declutter my desk space, which is exactly what it has done.
Does it perform effectively and efficiently?
Yes it works well effectively, cleaning up my desk space in a small and efficient way saving a lot of space on my desk.
what improvements could be made?
it could have been made with more side shelves to allow for more books to be held and it could have been made smaller so it doesn't take up as much room on my desk.
AESTHETICS:
I am very happy with the aesthetics of my desk tidy. The colour of my desk tidy that i chose was white. this was because my desk at home is white and i wanted it to match nicely. however, i wish i have added a little more colour to it as it is a bit too plain and boring and colour would have made it more exciting.
The shape of my desk tidy was interesting and different but was simple. this i found was very effective, as something something plain is better. overall i find my desk tidy very appealing and i would even consider buying one that looked like this in the shops.
ERGONOMICS:
my desk tidy is very convenient being fairly small, compact and light weight fitting on my desk space perfectly allowing my things to be decluttered. it is very useful when it comes to homework or study time as it allows you to place your ipad, phone, books and any other gadgets on the shelf, to give your more room to work. there is no safety issues when it comes to faults as the pieces very strongly and carefully glued together using a very strong acrylic glue, so this means that desk tidy will not collapse. they will also be no injuries when it comes to cuts as the sharp edges were all sanded down to soft curves.
ECONOMICS:
This desk tidy was very cheap to build making it very cost effective although it took a lot of time to make. Prices are as listed:
1 acrylic sheet 122cm x 244cm = 29768cm2
2444cm2 (how much used) x 29768 (size of 1 sheet) x 95.70 (cost of sheet plus GST) = cost of desk tidy
2444 x 29768 x 95.70 = $7.85
therefore my desk tidy cost approximetely $7.85
Thursday, 31 May 2012


assignment questions
1. Choose 2 machines that you used in the fabrication of your desk tidy. With these machines in mind, outline WPH&S considerations that must be adhered to when using these machines. Include photographs of your chosen machines (OnGuard may be an excellent resource for this question).
Safety procedures
· Wear safety glasses or a face shield.
· Wear hearing protection that is suitable for the level and frequency of the noise you are exposed to in the woodworking area.
· Wear protective footwear when required.
· Ensure the blade is tracking correctly and runs freely in and against the upper and lower guide rollers.
· Use band saw blades that are sharp, properly set and otherwise suitable for the job (e.g., the right tooth pitch; tooth form; blade width).
· Hold stock firmly and flat on the table to prevent the stock from turning and drawing your fingers against the blade. Keep hands braced against the table.
· Keep your hands on either side of the blade - not in line with the cutting line and the blade.
· Do not stop a band saw by thrusting stock against the cutting edge or the side of a blade immediately after the power has been shut off.
· Do not remove sawdust or cuttings from the table by hand or with compressed air. Use a stick or brush.
· Do not leave a saw running unattended. Turn off the power and make sure the machine has stopped running before leaving the area.
REFER TO PICTURE FOR DIAGRAM
Electric belt sander-
· Always wear safety goggles and a dust mask
When sanding, especially sanding over-head.
· The machine is not suitable for wet sanding.
· Do not use sanding paper larger than needed.
Extra paper extending beyond the sanding pad can also cause serious lacerations.
· The dust bag shall be equipped with the tool.
It shall be emptied frequently. To connect dust bag, insert the adapter of dust bag to the dust-collection opening on the rear end of the sander.
WARNING
· Do not throw sanding dust on an open fire
because materials in fine particle form may be explosive.
WARNING
· A suitable breathing respirator must be worn
while sanding lead paint, some woods and metal to avoid breathing the harmful/toxic dust or air.
REFER TO PICTURE FOR A DIAGRAM
2. The material you are using for your desk tidy is called Polymethylmethacrylate (ACRYLIC). It has specific properties and uses. Choose 2 other common polymers and in table form give their industrial name, common name, properties and uses.
Poly (styrene)
|
Nylon 66
| |
Industrial name
|
Polystyrene
|
polyamide
|
Common name
|
Styrofoam
|
Nylon 6/6
|
Properties
|
» Density – 1.05g/cc
» Dielectric constant – 2.4 to 2.7
» Thermal conductivity – 0.08 W/(m.K)
» Young’s modulus – 3000-3600 Mpa
» Tensile strength – 46 to 60 Mpa
» Melting point - 240°C
» Water absorption – 0.03 to 0.1
|
» Glass transition temp – 50°C
» Melting temp - 255°C
» Amorphous density at 25°C: 1.07g/cm3
» Crystalline density at 25°C: 1.24g/cm3
» Molecular weight of repeat unit – 226.32 g/mol
|
uses
|
· Imac computer cases
· Drinking cups
· Model cars
· Styrofoam
|
· Fabric for clothing
· Shock absorbers at high temperatures
· Intricate peices
|
3. Extrusion, injection molding, compression molding, vacuum forming and laminating are examples of common manufacturing processes used with polymers (Plastics). Choose one process and with the use of diagrams and bullet points outline the process.
COMPRESSION MOULDING
1. Material placed in open, heated mould cavity
2. Mould is closed with a top force or plug member, pressure is applied to force the material into contact with all mould areas.
3.
Heat and pressure maintained until molding material has cured
Heat and pressure maintained until molding material has cured
REFER TO PICTURE FOR DIAGRAM
4. Extension Work - Using processes acquired from your math’s lessons, calculate the amount of acrylic sheet that your FINAL desk tidy represents. Show all calculations; answer needs to be in square metres.
Working out:
10cm x 11.5cm x 2 = 230cm²
20cm x 16cm x 2 = 640cm²
24cm x 20cm = 480cm²
30cm x 24cm = 720cm²
20cm x 19cm = 380cm²
20cm x 7cm = 140cm²
26cm x 19cm = 494cm²
Total= 2444cm²
= 0.2444m²
My total amount of acrylic sheet that is used to make my desk tidy was 0.2444m²


Friday, 4 May 2012

Saturday, 28 April 2012
New unit
This term we are required to make a desk tidy. I have done all my preparation and drafting, and now I am half way through the process of making it. It have now cut out all my pieces and am now getting ready to put them all together
Wednesday, 18 April 2012
Isometric drawing
18th April 2012
I am now up to the process of drawing my shapes onto the plastic and cutting them out.
Here is an isometric drawing of my design. :)

I am now up to the process of drawing my shapes onto the plastic and cutting them out.
Here is an isometric drawing of my design. :)
Thursday, 22 March 2012
Video report (plastics and design)
Beauty of plastics is that u can incorporate anything in one part
PolyPropylene line is used to make containers. It's microwaveable and keeps it shape well
Styrene is Used in wine glasses
Bottle designers look out for different designs wherever they go
Working model can help demonstrate how objects work
'Die' is the mould that plastic goes into.
Need rim at bottom of bottle otherwise bottle will split
Friday, 16 March 2012
Ideation phase
Today we started our ideation phase for our desk tidy. Below is my idea of what I want to make.
New unit
Today we started our new unit. We got shown the design brief for our new assignment which told us that we were to make a desk tidy. Mr ward also took us into the workshop and showed us how to fabricate the acrylic which we will be using to make our desk tidy. I am really excited for this new term but I am sad that we will be getting a new teacher, I hope he is as good as Mr Ward :)
Wednesday, 14 March 2012

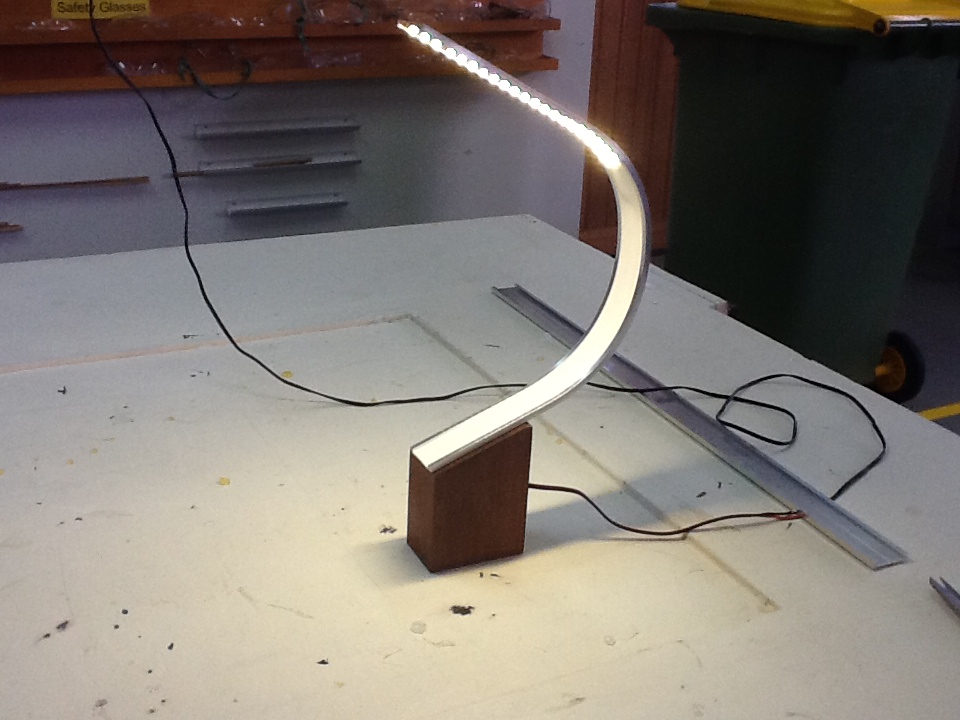
evaluation
This term the year 9 design futures students have explored and researched light. We were to design and make a small working desk lamp using LED technology. It was to be free standing and stable.
FUNCTION:
Does the arterfact do what it was designed to do? Yes, my LED desk lamp is free standing and stable and throws off light onto the desk.
Does it perform effectively and efficiently? Yes, it turns on and off efficiently and throws off a very bright light onto the desk allowing study/work to be done.
What improvements, if any, can be made to improve the artefacts function? There was only one improvement that i think should have been made. The curve of the aluminum should have been a little greater so that the arm with the LED light is at a higher angle so the light gets thrown out further onto the desk.
AESTHETICS:
I am very happy with the aesthetics of my LED lamp. My lamp is a suitable shape for 2012 because i find it very modern. The shape of my lamp balances well with the block of Jarrah wood, it is not unstable as the angles of the shape match up perfectly. Overall the visual aspect of my lamp is very attractive and i would even consider buying a lamp like this one if it was to be sold in the shops.
ERGONOMICS:
My LED lamp is very convenient being small and compact, light weight, and very bright. It is very useful when it comes to study, homework or reading as it will light up your page allowing you to see clearly. There is also no safety issue when it comes to electrical faults, light faults or unsteadiness as it has been very carefully wired and very carefully been adjusted so that the lamp is as steady as possible.
ECONOMICS:
This lamp was very cheap to build making it very cost effective although it took a lot of time to make. Prices are as listed:
- Aluminum- $2.40
- Jarrah Base- $2.40
- heat shrink- 15c
- LED strip- $5.85
- plastic- 45c
- cord- $2.80
In total my lamp cost around $14.05
Published 12/3/12 by Stephanie Purser
Published 12/3/12 by Stephanie Purser
Tuesday, 13 March 2012
Question 5
5. Research a modern day lighting designer and comment on their contribution to the design world?
Into Maurer ,
He was born in 1932. He founded the studio 'design m' where he designed his first lamp: 'bulb'
Info Maurer was a designer rare to find, he added provocation and fun to our ever so smooth design world
Question 4
4. How can the modern home become more energy efficient in regards to lighting?
If you are building or renovating your home, to make it more energy efficient try to add well designed windows and skylights to bring more natural light into your home which will use no electricity and is a great way to reduduce carbon emmissions, you could also add light tubes to allow more natural light to enter your home. You might also think bout painting your interior walls light colors, especially in the south facing rooms. This will reflect more light inside your home and reduce the need for artificial lighting. And finally when buying lights for your house, buy fluorescent lights as they are very energy efficient. Although they might be more expensive they can last 4-10 times longer than normal lights.
Question 3
3. Comment on global warming
The current cycle of global warming is changing the rhythms of climate that all living things have come to rely on. What will we do to slow this warming? How will we cope with the changes? Global warming is the increase of Earth's average surface temperature due to the effect of greenhouse gases, such as carbon dioxide emissions from burning fossil fuels or from deforestation, which trap heat that would otherwise escape from earth. This is a type of greenhouse effect. I believe global warming could be minimized by setting limits on global warming pollution, invest in green jobs and clean energy, drive smarter cars, create green homes and buildings and build better communities and transportation networks. If we all work together we can bring end to this greenhouse effect for good!
Question 2
2. Define the following lighting terms: ambient light, direct light diffuser, luminosity, energy efficiency, watts?
Ambient light- light surrounding an environment or subject, especially in regard to photography and other art work. Ambient light usually refers to natural light, either outdoors or coming through windows dictionary.com, www.mediacollage.com/
Direct light diffuser- diffusers help eliminate harsh light and shadows and helps leave your photo's looking more natural. Light diffusion is the scattering of direct light by making it pass through a non transparent material or by bouncing it off a semi reflective surface.
Luminosity- is the measure of stars, it measures how much energy per unit time the star is releasing. This energy is mostly emitted as electromagnetic radiation (light), however other forms of energy such as neutrino emission is also included.
Energy efficiency: is a fundamental element in our global fight against climate change. Climate Change means, 'using less energy to provide the same service'. It's role is to combat Climate change and promote sustainable development.
Watts: watts (W) is the international system of units (si) standard unit of power ( energy per unit time). The watt is used to specify the rate at which electrical energy is dissipated, or the rate at which electromagnetic energy is radiated
Question 1
Design futures questions:
What is the actual difference between light of different colours?
The wave lengths of each colour are different and are absorbed at different rates by different color objects. The light that is not absorbed by the object is the colour you see.
Thursday, 1 March 2012
Wednesday, 29 February 2012
In the past two lessons I have screwed my lamp together, I have cut and soldered my wire onto the LED strip and have stuck it onto the aluminum. I am currently in the process putting the plastic over the wires. After that has been completed I will be on the final stage of making my lamp, which is attaching the cord which allows my lamp to light up. This has been a very fun term, and I have enjoyed making my LED lamp. :)
Friday, 17 February 2012
16/2/12

today was a bit of a short lesson as I only had about 20 minutes beacause of school photos. But in the lesson I was able to shape the aluminium and get it fitted for the block of wood. The shape turned out a little different to what I had designed but I asked my friends and they thought that the design/shape looked good. Lets hope I get more work done in the next lesson. Above is a picture of what my lamp will turn out near the end product!
Subscribe to:
Comments (Atom)